Build a Music PC - XP2000 - super-cheap!! [pt3]
Ask a question about this subject?
Post a question direct to our forums and get mailed when a reply is added!
There are 3 viewer comments posted to this page - Read

Author: admin
Date: 14-Jan-03
Build a budget 2000 Athlon XP music PC - Page 3 - Booting to BIOS, adding drives & Prep to OS setup.
Ok.... we are ready to boot for the first time.... we have our board in place, with cpu & cooler assembly fitted, plus our ram installed... that is it, no floppy, drive, cd or hard-drive etc just the basics... It's quite a scary moment, like after an engine build, that anticipation as you turn the engine for the first time... All we need to do now is check the machine boots, so that we know our ram, board & cpu are all working ok... Then we can setup the BIOS ready to add-in our drives so as to be able to install the OS... so no tweaking at this point, just basics.
Booting into the BIOS for the first time
This board boots to show the ASUS logo fullscreen in colour (optional in Bios btw)... Now, I'll be honest, I'm writing this several months AFTER building the PC because i wanted to give the PC time to see how reliable it was over a few months since the build. Also, at the time of build the board was new on the market & the 2ghz CPU was the fastest but one ATHLON CPU you could get.... Now at publication this PC would be much cheaper to build & I can tell you it has been wholey reliable, so I can say that this PC build is robust and reliable and now it is a real budget build offering tons of power for peanuts!
The second point of saying that is this:
I can't remember for sure, BUT when you first boot the PC with NO drives attached it might automaticaly go into the BIOS... So boot it, and see it if does go into the BIOS Setup.
IF not, simply reboot by pressing the reboot button (or holding down CTRL/ATLT and pressing the Delete key) and on boot the ASUS logo appears (as mentioned above), like this:

At that point, hit the DEL key to enter the BIOS - Be quick, have your finger ready over the DEL key cos this machine is fast & boots like lightning.
Ok.... Here's our BIOS opening screen:
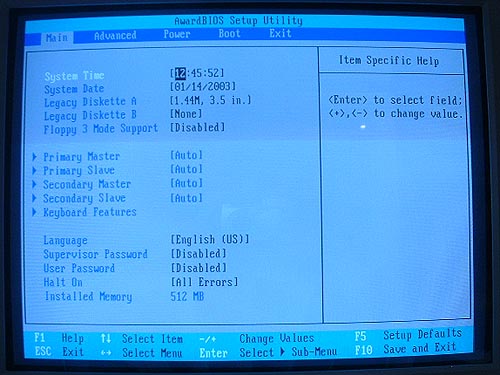
Everything is set to default - all the drive slots, (primary master/primary slave - secondary master/secondary slave) should be set to [AUTO]
Even though there is no floppy-drive attached, the: Legacy Diskette A line at the top should still show: [1.44M, 3.5 in.] - However, if it shows [none] & you did not add the floppy drive yet, don't worry...
Ok make sure all those drive slots read: [AUTO] - and we only need to set ONE thing before adding our drives and booting the PC to install the Operating system - It's best to leave eveything mostly to default setings for installing the OS - we can come back to the BIOS after installing our OS and make tweaks. For now there is simply a few things to set before we setup the PC.... those things are:
1. Setting the CPU speed setting
2. Setting the Plug & Play OS setting
Ok... at the top of the screen you'll see we are in the opening/default BIOS menu: MAIN
We need to move to the next menu item called: ADVANCED
Use the keyboard arrow keys to move to the right to the next menu
![]()
This is what the screen looks like - Set the CPU Speed to: [1667MHz]

If the CPU Speed is set to [1250MHz] it needs to be changed - To do this, with the 'CPU Speed' setting highlighted in Black as in the image, hit the keyboard ENTER key, and this menu appears:
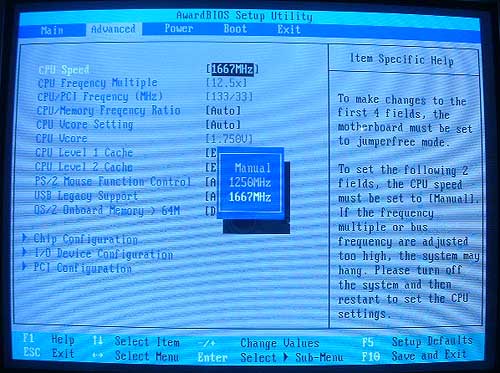
Then simply use the UP/DOWN arrow keys to select 1667MHz - When selected, hit enter and it'll be set to 1667MHz which is the correct speed for the 2Ghz cpu we are using.
Next, use the arrow keys and scroll down to the menu item: Chip Configuration
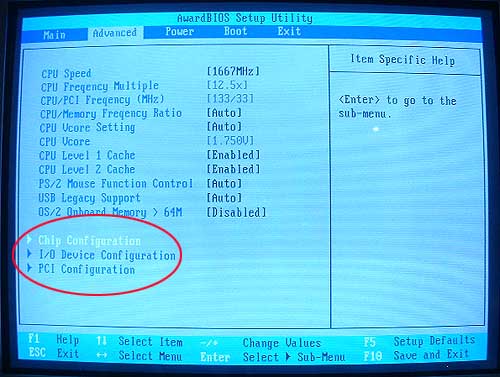
Hit the ENTER key and go into that sub-menu - it should look like this:
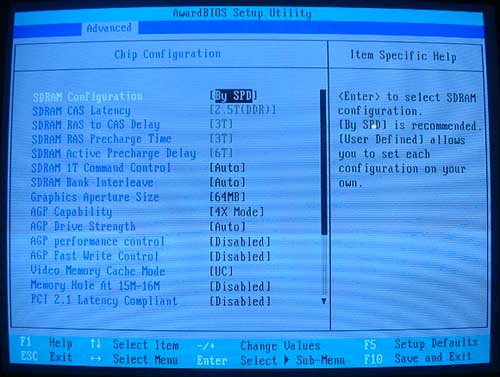
Use the arrow key to scroll down to view the lower-half of the sub-menu
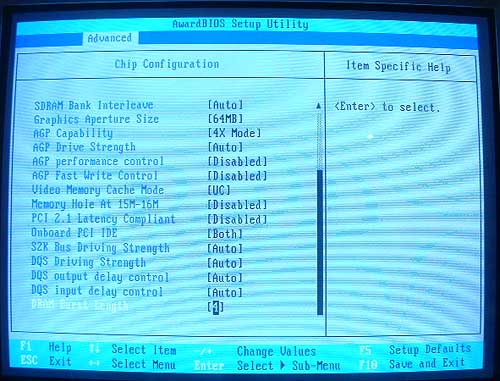
It should look like that.
Ok - That's it for now - All we do now is save that and power down - Then we can add our drives.... So, hit the ESC key to exit that menu, and then scroll right with the arrow keys across the main top menu's to: EXIT

With Exit & Save Changes highlighted, hit the ENTER key and this select-menu appears:
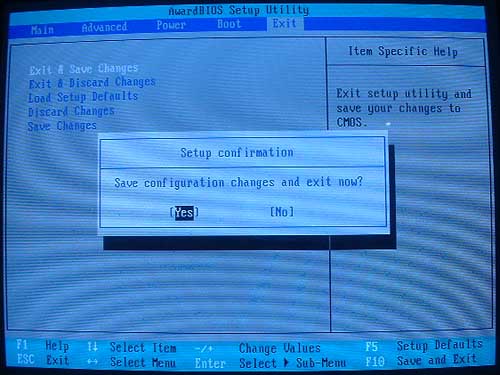
Choose YES, then hit the ENTER key and the PC starts to reboot... Press the power ON button and hold it down for a few seconds and the PC will switch off...
Now we can add our drives.... Once that is done we need to re-enter the BIOS just to check the drives are all detected ok, and make a couple more setting changes.... Then we can get down to installing our OS.
Disk drives for a music PC - Some thoughts & pre-amble
Now... most people start out with a computer which has a single fixed disk drive & a CD-Rom drive (or cd-read/write drive) - A fixed disk drive is the term applied to ALL non-removable drives such as normal hard-drives - On a PC you have currently 2 IDE channels.. The IDE channels are the bus-lanes so to speak down which data travels between the chipset and cpu processor etc & any drives fitted to the system...
IDE channel 0 is the primary IDE bus/channel
IDE channel 1 is the secondary IDE bus/channel
Now as i said, most people start out with a single disk drive, and this may be PARTITIONED to create two or more VIRTUAL drives on the same single disk - A PARTITIONED drive is simple a drive which has been set so as to be devided into distinct individual drives which appear in your PC 'MY COMPUTER' display as actual seperate drives, each with it's own drive-letter (C:, D:, E:, etc)
A partioned drive works fine... You might have an 80gb drive partitioned as 3 virtual drives:
- C: drive - Your boot drive partition for Windows and your programmes.
- D: drive - 2nd Partition for audio data only.
- E: drive - 3rd partition for samples only
etc etc.... Now this is all well and good... partitioning your drive allows you for example to format your main C: boot drive in standard FAT32 format which is perfect for Windows and programme files.... You can then option to format your second partition D: virtual drive in a larger cluster format suitable for audio files (more on this later in the 'formatting the drives' -section of this article) - The C: drive will only contain your programmes, NOT your songs, or samples etc, so should you need to re-install Windows (and you will because it's good for your PC 'health' to re-install Windows from time-to-time), you simply re-install Windows on the C: drive, then re-install your music programmes into Windows, and all your songs etc are ready to load from the untouched partitioned virtual-drive/s they are stored on, such as D: or E: drive partitions - So, it all seems fine... Easy to manage seperate virtual drives created using partitions... However...
All these created partitions are of course situated on the same actual PHYSICAL drive... You have ONE hard-drive which is devided into partitioned virtual-drives... So while from a management point of view all your data is easy to manage on these seperate virtual-drives.. one for windows and programmes, one for audio data, one for backup data etc etc... What happens if the disk dies on you?!.... That's right... if the disk dies, PROBABLY, all the partitioned virtual-drives will also be unavailable...
IS IT WORTH IT!? - ok, this is a worst case scenario, but honestly... The pain!!... the agony of those lost ideas and songs.. Well, suffice to say I hate to see a grown PC musician cry, so my advice is always to use TWO PHYSICAL DRIVES
ARTHUR '2 DRIVES' JACKSON...
When you go to buy your drive, perhaps at the PC fair etc, you'll see 40gb, 60gb and 80gb drives on sale commonly... You'll also see bigger 120gb drives... a 40gb drive might be �50 quid, an 80gb drive might be �70 quid... It's easy to think; "I only need to add an extra 20 quid and I get double the space!" - it IS tempting to get a single 80gb or 120gb drive - but really, if you cannot afford two drives NOW, then get one smaller drive for your main C: Windows/boot drive (and any partitions you might add to that drive), and as soon as possible, go out and buy ANOTHER physical drive... That way, you have your work on one drive, and your backup on another ... It doesnt mater if these two distinct seperate physical drives are partitioned, each into several drives, what IS important, is that you have your data backed up on TWO distinct seperate pysical drives... If one drive dies, you have another copy of your work on the other physical drive...
Another advantages with two actual physical drives is this - Remember, a single IDE drive can be PARTITIONED into several virtual drives... fine, but because all those partitioned 'virtual-drives' reside on the same physical disk-drive, it means they are all on the same IDE channel/bus... Each IDE channel/bus has a maximum thru-put or bandwidth... only so much data can move along an IDE channel... therefore, by using two drives, one on each IDE channel, you can improve data movement by running data on 2 IDE channels at the same time....
Another time this can come in handy is when burning CD's or doing video soundtrack work etc... your cd-burner is on one IDE channel and the data it requires in pumped in from the other channel, or your music data is on one channel and your video is on another etc... It's a good idea to keep your main primary Windows and programmes C: drive on a different bus to the CD-ROM/writer...
Idealy you want a seperate 'work' audio space on your drive which you can load your current work 'in session' project/s, and work on it/them... samples remain in all their original locations on your disk-based library, so they load fine and don't have to be backed up on a song-by-song basis unless you choose to archive the whole project, samples & all - Most major sequencers now allow you to export a finished work/song complete with all 'USED' sections of recorded audio... in some cases you can option to discard un-used audio and/or archive etc... whatever, all I'm saying is... idealy you want like a cart backup to 'dump stuff to' as backups, then load them in to work on them.... Keep the work drive area clean and clear, archive finished songs, and keep your work audio disk space free of clutter.... use the second physical disk to also archive.. You then have TWO live 'saved' copies of your songs.. one on the physical disk 'backup' area which is idealy a partitioned 'virtual-drive', so that all your backups are on one easy to manage partition)... and the other copy saved to Jaz cart or whatever backup medium.. it really is worth investing in a Jaz cart or similar storage backup at some point, especialy if you work with clients... You reputation's down the crapper if you lose their great song, even if it wasn't 'your fault'!
Older PC's can be used too for backup disk space... it's easy to network your PC's... that'll have to be another article then... *sigh*...
Another thing to consider is, these disks usualy last years, so they'll carry over to any upgrade PC... All I do is rotate component's downwardly... For a new box build I get the latest fastest drive to be used as the box's MASTER boot Primary IDE 0 channel physical drive... So I'll buy a new drive (and ram) for a new build to always have the fastest drives/ram to match the new motherboard.. the older drives, still fast, become backup drives and work their way down the ranks, until a few years later they are on a storage machine on the network holding backups of rarely used but important data... I got a few songs archived on some old 1gb fujitsu drive, a couple of 3.5gb or so drives, a few 20's, lot's of 40's etc...ok back to reality... um..
So... GET TWO DRIVES!... it'll save your bacon in the long run I'm sure
Now the next thing is this.... I'm starting to think that the best thing for this article would be to make a dedicated page for partitioning & formatting a drive in both 98 and XP, then refer the reader at this point to the desired page... Dancetech doesn't yet have it's own 'How to add/partition & format drives' Article page... It might be better to make those two pages and then you can read whichever one is applicable to the OS you're using... Yup!.. that's how I'll do it I think cos people will always want that info regardless of wether they are following this 'Build a Cheap Music PC' article... Also, XP and 98 install differently....
So... let's get the actual physical drives installed & everything prepared in the BIOS, then we can move on to installing the Windows OS...
Adding the drives, more bios tasks & prep to OS setup
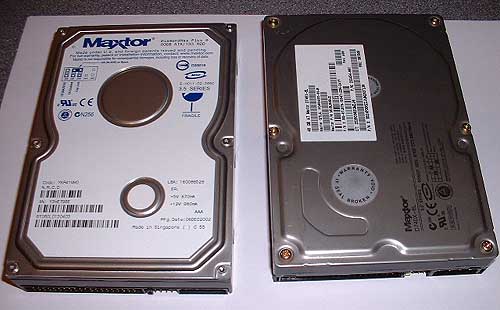
Here's a couple of Maxtor disk drives commonly available at local PC Fair's throughout the UK.... On the left is a new 80gb ATA133 7200 RPM drive, and on the right is a slightly older 40gb ATA100 7200RPM drive....
Each drive has a legend/diagram on it showing the JUMPER settings... Jumpers need to be set to determine wether the drive you are installing is to be a MASTER or SLAVE device...
As mentioned earlier in this page, a typical PC right now at todays date of this page has 2 IDE busses... Each IDE bus can have (commonly) 2 physical drives attached to it, although the more recent ata100 80 pin cables combined with latest motherboards will allow actualy 4 physical drives per IDE channel, and there are more developments to come in this area... Soon, IDE channels will be pretty much like SCSI, allowing multiple physical drives to be added per IDE Channel, however, for now and for simplicity for newbies, we'll say that each IDE channel or Bus can have two physical drives... That's the most common scenario as sold by named 'Music-PC' vendors, and certainly is the way to go for a nice stable trouble-free machine...
IF you add two physical drives to an IDE channel, one has to be the MASTER and one the SLAVE... If you only add ONE physical drive, that physical drive has to be the MASTER.... whatever... You have to set the jumpers on the drives you add...
In this example build then, we'll start by adding a SINGLE physical drive (a 'hard drive'), which will be our master physical drive on IDE channel 0 (the first IDE channel) - I'll step you through that, and then later I'll add a supplement for 'Adding a second physical drive', which as I said, you should definately add asap!...
So we need to add in our physical drive to the pc, and first we need to check & set the drive's JUMPER to make sure the drive is set to be MASTER... It's going to be the only hard-drive in our PC to start with until we add another one, so we need to set it as MASTER anyways even though on the same IDE channel we will add it to, (IDE 0), there wont be any secondary SLAVE device...
This physical drive will be alone on IDE channel 0, (the first or 'Primary' IDE channel) - set as MASTER
The CD-ROM drive will be alone on IDE channel 1, (the second or 'Secondary' IDE channel) - set as MASTER
When you add-in your second physical drive, it'll be added on to IDE channel 1 (the 'Secondary' IDE channel) along with your CD-ROM drive...
I'll just add at this point - that for all usual tasks of home recording, making song demo's, and for 'professional' or larger compositions with reasonably high track-rates, you will not see a huge difference between ata 100 & ata 133 drives.
SETTING THE DRIVE JUMPERS
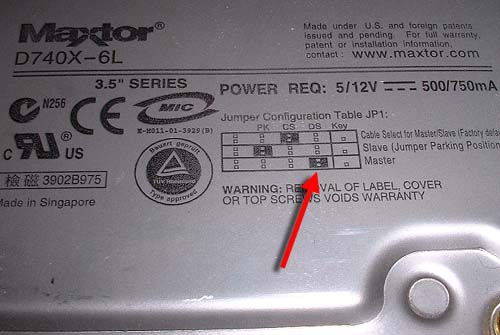
Now in this piccy you can see the MAXTOR 40gb ata100 drive and the setting for MASTER position.... Sometimes these 'maps' are upside down... check-it out...
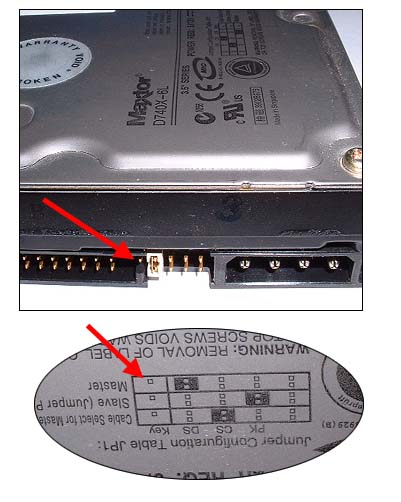
Here's the actual drive jumpers set to MASTER position - You can see the single pin highlighted by the red arrow, and how that pin matches the small pin icon on the map when turned upside down! - Nut's huh!?... anyways....
This recently purchased MAXTOR 80gb ata133 drive has somewhat better jumper setting 'map'...

it matches easily the actual physical jumper position the right way up!!
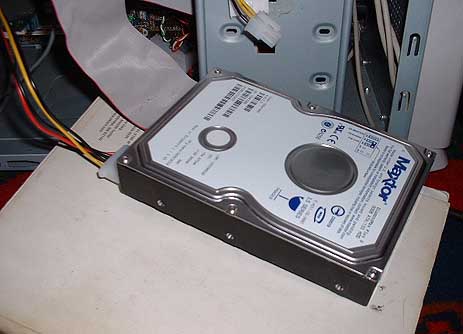
Ok so set the drive to MASTER and plug it in... to be honest, at this point, it doesn't matter if the drive is actualy screwed into the PC case... it can be just lying on the floor on a mousemat or other protective 'mat'. - As long as the power & IDE cable is attached, it'll work, so we can check everything boot's ok then actualy physicaly 'install' the drive at the end... bolting it into it's case mounting area... Again, I like to check it's all 'go' before bolting things in properly...
Ok, so the drive is connected via the 80 pin ribbon IDE cable to the first (IDE channel 0) motherboard connector and has power...
Take the other IDE cable... (YOU DID GET TWO RIGHT!!!!)... get the other IDE cable, and plug the CD-ROM into the second (IDE channel 1) motherboard connector
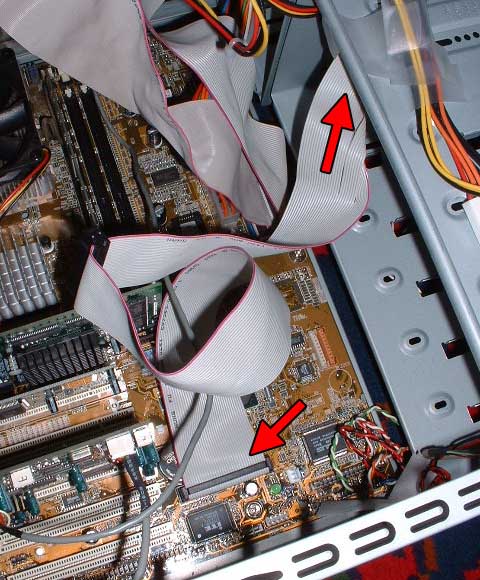
Plugging in IDE cables is 'one-way' - The socket has a notch at the top, so the connector can only go in one way....

Also the IDE ribbon cable itself, has one outer edge striped red - That is pin-1 and usualy goes next to the jumper pins & power connector... in the picture above Pin 1 is next to the jumper
Here's the 80gb MAXTOR drive ready to go...
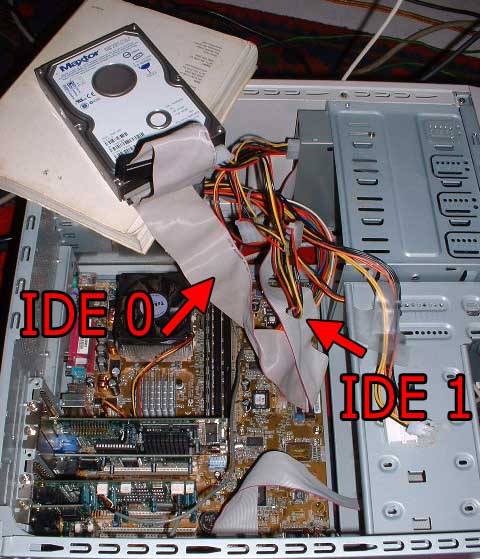
So, we have now our physical drive (hard-drive) on the first IDE connector/channel - CD-ROM on the second... Both set as MASTER, each on it's own IDE channel.....
Here's a closeup of the motherboard IDE channel ribbon cable connector sockets...
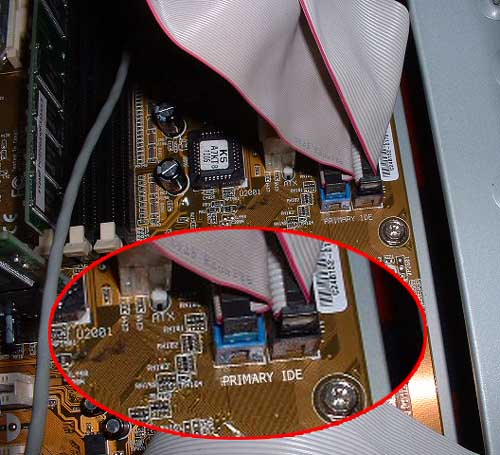
You can see the 'Primary' IDE channel is marked... On all motherboards these two IDE channel sockets will be marked as 1 & 2 or primary & secondary etc....
Here's the case with the Maxtor 80gb wired to IDE 0 (primary channel) - and the CD-ROM wired to IDE 1 (secondary channel)
Adding the floppy drive
Ok... add-in the floppy drive, which is a simple affair and should require no images or explanation. The floppy drive slots into it's drive bay until the front of the drive is level with the case fascia... screw it home in the case with a couple of locating screws... It's always a GOOD idea when adding in drives for the first time to NOT screw them in 100% with all possible locating screws (total of 4 - 2 each side)... There may be problems, and it's a pain to have to undo ALL those screws again just to remove and check a drive!.... Once all is working you can then finaly bolt your drives in 100% using all the locating screws.... Here's the Floppy drive cabled in, which has it's own dedicated motherboard socket....
Ok... so put in the floppy drive, and connect the narrow floppy-drive ribbon cable between the motherboard socket (see manual) and the drive.... Like with all drives the connector can only plug-in one way, so you can't make a mistake...
NOTE: in the images above you can see some cards added to the PC... Ignore that. - I'm adding this page after the PC was built... At this stage in the proceedings you should not have ANY cards in the PC apart from the AGP grphics card... We'll add our soundcard etc AFTER we've installed Windows... (That'll be the final section of this article)
Ok!!...
Our hard drive is in place on the Primary IDE channel 0
Our CD-ROM drive is in place on the Secondary IDE channel 1
Our Floppy drive is in place on the floppy connector
Now what we want to do now is boot up again into the BIOS & check our drive & CD-ROM are functioning & recognised by the PC bios... There's a few more BIOS tweaks to do and then we can setup the physical hard-disk & install our Windows OS ... Nearly there!!.. heh heh!....
Next Article Section - BOOT TO BIOS, DETECT DRIVES & FINAL TWEAKS BEFORE OS INSTALL
- Article Section 1 - INTRODUCTION, PARTS, THOUGHTS, ETC
- Article Section 2 - THE PHYSICAL PC BUILD PRIOR TO FIRST TEST BOOT-UP
- Article Section 3 - FIRST BOOT-UP INTO THE BIOS + ADD DRIVES
- Article Section 4 - BOOT TO BIOS, DETECT DRIVES - Final tweaks prior to O/S install
- Article Section 5 - WIN XP O/S INSTALL - 'Plug & Play' & 'Standard PC' installs
- Article Section 6 - WIN XP O/S Tweaks - Final BIOS ram & cpu/mem/ratio tweaks
COMMENTS FOR:
'Build a Music PC - XP2000 - super-cheap!! [pt3]'There are a total: 3 comments posted to this page.
Name: james mc intyre
Email:
Activity: Hobby-ist
Date: 28-Oct-03
love the site,i wanna start making my own dance music(TECHNO),i have a good pc and that,just wondering could you help me on what i would need CHEERS
| Article rating out of 5: |
Article 'ratings' were added September 2008, so most articles have no viewer rating
Name: Keegan Davis
Email:
Activity: Hobby-ist
Date: 28-Mar-04
This is like a message made to answer my questions. A friend sent it to me and it is right on the money with what I am doing. One huge question, I bought a athlon xp 2400 and the computer is only recognizing it as a 1.5 ghz and 1800. When I try to change the bios it will not let me restart without changing back to the previous setting of only 100 mhz. It did show up at 2400 a few times but not anymore. What can I do. I am going to live on this page. the info and photos are finally some info that isn't a few years old. I even use a asus motherboard. Thanks for the help.
| Article rating out of 5: |
Article 'ratings' were added September 2008, so most articles have no viewer rating
Last added comment
Name: NITESH
Email:
Activity:
Date: 06-Dec-05
TELL MORE ABOUT IDE
| Article rating out of 5: |
Article 'ratings' were added September 2008, so most articles have no viewer rating
'Build a Music PC - XP2000 - super-cheap!! [pt3]'
Note: To cut down on spammers, cookies must be enabled to post comments to this page.
[back to top]