We'll call this the 'Logic Mix Automation Supplement Page' - it's stuff which is added to compliment the main article... some tips about things to make working on mix automation easier or better organised etc... Some of the things on this page will be of use elsewhere in the Programme for Logic newbies.
WORKING IN ZOOM
Logic's got a nifty control switch to allow you to zoom-in to a track on the arrange-page in isolation...

Highlight the required track with the mixer moves and use command: 'CTRL/ALT + the up/down/L/R arrow keypad'...
- CTRL/ALT + down arrow = track zoom in
- CTRL/ALT + up arrow = track zoom out
- CTRL/ALT + Left arrow = track zoom out full
- CTRL/ALT + right arrow = all tracks zoom out full
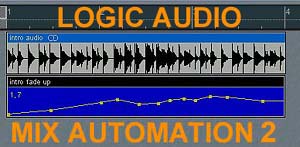
Can't quite see the point of the 'CTRL/ALT + Right arrow' command as i cant seem to zoom in to more than one selected track even if more then one track header is selected/highlighted... Also again, another niggle... there is no ability it seems to zoom-IN with bigger 'jumps'... so zooming in to a solo track to expand it's depth means several clicks... Still, as you can see from the image above, it is great to allow you to view the automation 'in-situ' relative to other Parts on the arrange-page!... in this instance in the image above, the mixer hyper-edit blue nodes show the channel-1 fader moves (1.7), with the audio Part visible above it's easier to quickly draw-in a visual fader drop-out where the actual audio part ends to close the channel down a bit.. perhaps ready for a fade-up when the next bit of audio arrives on the arrange-page.
SPLIT SCREEN....
Nope... it's NOT Jamie Oliver malarkee-ing around in his trendy vintage VW camper!!... it's setting up a screen-set & working so that we can:
1. See our Logic mixer enabling us to quickly click-on & drag/move any of the mixer channel parameters to record them.... and:
2. See the arrange-page with the recorded/edited automation Parts

Like this see!!.... a typical screenset for doing some automated mix record, creation & edits...
First, select the audio mixer environment layer by double-clicking on the Track Header Instrument/object icon or title (see last article)... Get the ARROW TOOL from the toolbox, and drag a box around the ENTIRE mixer from Left to the master-out fader on the far right... Now go to the 'Parameters Panel' on the Left of the screen (opens/hides with 'H' key)...

Now, DE-TICK the
'SHOW I/O' checkbox - This removes the input & output 'slots' from the Mixer channels making them shorter.... If you are NOT using any of the Logic Channel EQ's - (Blue 'Thru' in black box at top of channel marked 'Eq') - then you can also DE-TICK the
'SHOW EQs' checkbox to make the channels shorter again... If you are just doing Pan & Volume-Fader moves you can DE-TICK the 'Show Sends' & 'Show Inserts' to make the channels REALLY short in height...
The upshot of this excercise of course it to get a 'shallower' audio mixer verticaly so that MORE of our screen can be dedicated to the Arrange-Page panel...

Ok... Now we've shortened the height of all our mixer channels, re-size the panel so it fit's snugg height-wise....

We now have a nice thin mixer & we can open/move our Arrange-Page and re-size them both to afford a good SPLIT-SCREEN work-view!... the individual Track ZOOM-IN/OUT reaps dividends here as mentioned because you can see the detailo of the controller editing and also the surrounding arrangement - (these screen images were done with a 15" monitor).
NOW WE CAN SAVE THIS VIEW AS A SCREENSET - then we can click and open this view anytime!... ok.. choose a QWERTY number key such as the number 9 key - (above the 'i' & 'o')
Now... Hold down SHIFT and click on the qwert 'KEY 9' - this dialog-box appears.....

Answer with: 'COPY TO 9' and now it is set to SCREENSET-9 you can recall this view anytime by simply clicking the '9' key -
If you didn't know SCREENSETS yet then next, click the '1' number key.... the screen may change, but if it stays the same don't worry...
Now, close everything except the ARRANGE window, and MAXIMISE it... Now hold down SHIFT key and click the Number '1' number key on the qwerty keyboard... again you'll be asked but this time wether to 'COPY TO 1' (screenset 1) - Answer with: 'COPY TO 1'
Now the full-screen ARRANGE page is your default qwerty 'KEY 1'.
Your Mix-edit split-scren view is on qwerty 'KEY 9'.
Carry on like that and create SCREENSET's for your piano-edit screen, your hyper-edit screen, audio-folder etc... To access Screenset's 11-99, double-click combinations of keys - Example:
Double-click qwerty 'Key 1' to ACCESS 'Screenset 11'
Hold down SHIFT & double-click qwerty 'Key 1' to ASSIGN the current screen arrangement to 'Screenset 11'
Well, that's screensets in brief.. I'm sure they are mentioned in other Dancetech Logic articles... Anyways, another handy thing about the SPLIT SCREEN view... is that you can see the mixer channels moving if you decide you'd rather record your moves using some hardware controllers on your synth!!....
HARDWARE CONTROL
OK... without a dedicated controller box featuring a row of 8 or 16 channels each with a fader, we can still set-up an easy to use thing so that we can move our synth hardware controls to move the mixer channel controls on a 'channel by channel' basis...
We can setup hardware controls for the required parameters for whatever we wish to automate for ONE channel.. then simply create our automation recording channel-by-channel over-dubbing each new bit of automation... With a multi-fader/channel controller, we can move MORE than one channel controls at a time.. but as most users will have a few midi 'sending' hardware controllers on their synth this way is a good compromise as overdubbing automation works very effectively once you start to layer effects & moves...
Ok.. let's setup a synth for control of our mixer while we record... It's pretty simple if you have the controller numbers (we'll come to that)... In the simplest external hardware automation setup with a simple synth:
- Choose a hardware control slider or pot or pedal on your synth & assign it to send OUT Midi CC no. 7 (Volume)
- Then set say your Mod-wheel to send out Midi CC no. 10 (Pan)
- Now set your synth MASTER OUT midi channel to whatever mixer channel you wish to move....
Now select the Arrange-page Track with the 'A-Playback' Object assigned to it (for audio-tracks 1-16), and make sure the Red Record button is lit....

Now, making sure you master-keyboard/synth (that we setup the controllers on) is set to send Out Midi on channel-1, move the VOLUME or PAN assigned hardware controller... If you did it right when you move the VOLUME assigned controller you should see the Logic Transport-Bar right-hand Midi IN indicator box flicker with the blue numbers 1 & 7 (for volume) or 1 & 10 (for pan) - You should also see the Audio-Mixer channel-1 Fader & pan move around!!....
Ok, from there it is simply a case of changing the Midi OUT channel of controller synth to the required channel to hardware control the Volume & pan on channels 1-16 of the audio mixer... For further channel adjustment you must then select a new Track with the appropriately assigned 'Playback Object'...
- 'A-Playback' - Mixer audio channels 1-16 (midi channels 1-16)
- 'B-Playback' - Mixer audio channels 17-32 (midi channels 1-16)
- 'C-Playback' - Mixer audio channels 33-48 (midi channels 1-16)
- 'B-Playback' - Mixer audio channels 49-64 (midi channels 1-16)
IDENTIFYING THE CONTROLLER
Ok... Volume & pan are easy.. But many users have a hardware synth with mebbe 10 knobs or more that send out controller data... we can therefore assign MORE automated mixer channel parameters to be hardware adjusted... First we must know the Controller number of the part of the mixer we wish to automate...
Ok - we're going to automate a sweep filter which you could apply say to a guitar part or drum part etc.... ok, first setup a parametric on the Mixer channel-1 'Eq' slot (the one with the blue 'Thru' in it at the top of the channel - Click on the 'Thru' and choose an eq... i choose a parametric..

I've set the parametric to around 1500hz, with a not-to-steep 'Q' - (newbies please search DT 'Tech-Articles' section for 'EQ') - and boosted it by about 7.5db - that'll create a 'peak' in the eq at whatever Frequency is set, and that 'peak' or eq boost will be as wide as the 'Q' control which is quite steep so the filter will be quite drastic cutting off the frequencies both below AND above the selected frequency... ok now let's find out it's controller number... This is the audio-mixer channel-1 so it will be Midi channel-1 on your synth...
Ok... Now with the Arrange-page Track selected which is assigned to 'A-Playback' Object, hit record and click on the Mixer screen parametric-eq FREQUENCY slot and drag a Frequency sweep down and then up and down again.... It should look something like this when you hit stop...

Now... with the newly recorded part selected, hit the F3 key - (auto-define)....

and hey-presto... there's your required CC number.... 16 - now simply assign this CC number to one of your hardware controllers
Now go to the Arrange-Page and select/highlight the 'A-Playback' assigned Track & make sure it's Red Record button is LIT.... Now move the 'CONTROLLER 16' assigned hardware controller on your synth & you should see the Logic Transport-Bar right-hand Midi IN indicator box flicker with the blue numbers 1 & 16 - You should also see the Audio-Mixer channel-1 Parametric-Eq 'Frequency' parameter move around!!
Well..... There's a few tips. - Once you get the eq sweep recorded and edited to your satisfaction you can see from there how to get the required number's for whatever you plugin - This can be Send controls or plugin parameters etc....
When I next update this page it'll be about organisational tips for keeping your automation clearly laid out and lighting fast to access & edit... Also, we need to add details for automating VSTi's & Logic Instruments and the MASTER output mixer channels which both work differently as they do NOT 'sum' to a Hub object for recording their midi control automation moves... Looks like this will have to be a 3 or 4 part Article!...
LOGIC - Mix Automation 1


Read 10 comments
Add review/comment