Arrrrr... it's not like Ye Olde Dayse when Cubase on ATARI had a simple easy setup for controlling your Cubase transport via keys on your keyboard... In fact this function was included & active by default, setup with the transport functions assigned to upper octave keys.
In fact this function could provide laughs a plenty after a few beers in the studio!... All you had to do was wait till your mate (or victim) went out of the studio for a p*ss or to make a cuppa or whatever, then quickly re-assign one of the functions such as STOP to a new lower octave key somewhere in the middle of the keyboard. When they came back, they'd go to play and find that Cubase would keep mysteriously stopping in the middle of their performance, lol!!... hours of fun watching them go utterly beserk trying to figure out why!.. But I digress :)
This short tutorial pertains to Cubase SX, not sure what they've done with Cubase 4 yet, so here we go...
OK, first, open the menu item:
DEVICES / DEVICE SETUP
Select the
ADD/REMOVE tab & choose
GENERIC REMOTE

With the
GENERIC REMOTE highlighted, click the
ADD button and the
GENERIC REMOTE appears in your devices list on the left

With the
GENRIC REMOTE item highlighted on the left colum, click the
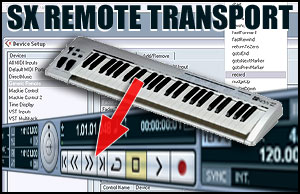
SETUP tab and this screen appears:

In this example I did not assign a MIDI input, but you will need to assign this to the midi port of choice on your system, you don't need to add a MIDI output port, cos all we need is to receive a note command from the keyboard, we're not transmitting anything back out again.
Ok... now let's assign two MIDI notes from our master keyboard to control the functions RECORD & STOP - of course you can add more functions in the rows working downwards if required.

Highlight the first row which defaults to the title:
FADER 1
HOLD DOWN the
LEARN button with your mouse & then
PRESS AND RELEASE the required MIDI note on your master keyboard
Now
RELEASE the
LEARN button
Do this with row 2 also but choose a different MIDI note of course... NOW, click on the MAX VALUE field and change it to 1 (one), this will ensure that whatever velocity you hit the key with the function will happen because the lowest velocity level (1) is enuff to trigger it.
Your two rows should now look like the image above except the two note numbers which in this example are 95 and 96 might be different if you choose a different 2 notes - Remember of course that if your MIDI keyboard is not a full 88 keys and you can step UP/DOWN the keyboard octaves with an octave function key then whichever octave-range your master keyboard is set to will effect which notes you are sending out for Cubase to learn.
Now lets set the destination rows below:

Click on the DEVICE column for row one and choose
TRANSPORT - Make sure the 3rd column
CHANNEL/CATEGORY is set to
DEVICE which should happen automaticaly once you select
TRANSPORT
Now click in the 4th column
VALUE/ACTION and this big list of transport functions appears... choose the value, in this case
RECORD - Repeat this for row 2 and choose
STOP - Now we have mapped 2 keys to
RECORD &
STOP

You final panel should look like this image below, except that the
MIDI INPUT selector should have your assigned MIDI port selected - You can now click the
APPLY button!

Note that the last field (FLAGS) in the UPPER section rows is set to '
R' which is
RECEIVE - That's all you need to be selected for that field; you can alter this if required manualy by clicking on the FLAGS field and manualy selecting/ticking only RECEIVE, but using the LEARN function this should happen automaticaly.
If you like you can rename this remote bank as TRANSPORT or whatever using the
RENAME button...

Here's my final page display setup for just two keyboard key-press
NOTE ON commands to control
RECORD &
STOP - Now click
APPLY again (if you renamed and it is not greyed out) and then click
OK to close the setup panel...

Back on the arrange page select MENU item:
DEVICES / GENERIC REMOTE

This pop up box appears... Select the required profile and off you go.. Cubase will now respond to key presses for transport functions...

Of course as mentioned you can add as many functions to keyboard note ON commands as you like and cluster them in whatever note locations you like, usualy up at the very top octave of the keyboard, but of course you can open the GENERIC REMOTE setup any time and simply change the required IN NOTE for any function - Remember, In Notes are numerical, so you can't type in C#5 or whatever... Use the LEARN function as decribed to simply add-in any required key press in one easy move, but just remember the MAX VALUE field will set itself to whatever velocity you used to press the keyboard key when in LEARN mode, and you need perhaps as suggested to lower this value manualy to ensure pressing the assigned key always triggers the transport function... If the MAX VALUE field is set to high, then you don't want to have to pound the assigned keyboard key with a mighty velocity just to trigger the function :)
Good luck... any questions as on our forums.


Read 8 comments
Add review/comment