


basic page for newbies showing what makes a pc and how the parts are laid out and connect in a typical IBM pc. Plus initial thoughts & prices on building a pc on a cheap or average budget.

The Power supply connects to the board with ONE large multi-pin connector... that is the only connection apart from switch cables for things like 're-boot' button. - The drives are connected also to the power supply, which feeds the accessories with a set of power cables terminating in connectors. Typicaly a PC will have 4 or 6 or 8 available drive power connectors and the main motherboard power block connector.
The motherboard powerblock connector which attaches the power from the supply to the motherboard cannot be plugged in the wrong way round... it has a fixed shape socket & plug that can only go in one way. - It is the same with the drive power plugs & socket's and all sockets that you need to connect if you decide to build a pc.

Here's a drive power connector type of plug, which all feed from the power-supply...
Let's look closer at the motherboard.... don't worry if it doesn't look like your's - this article is simply to familiarise newbies with the parts of the pc... your board may be a different look but the 3 main components here - [ power - board with cpu & ram & cards - drives ] -

Here we can see inside the case looking up at the board, you see this older VX chipset board has 3 ISA slot's and there is 4 PCI slots... The first 3 from the top are occupied with cards - the 4th PCI slot is free and can be seen as the cream coloured slot above the 3 darker-longer ISA slots beneath. The last card is the SBLive OEM card and the smaller cable connecting to it is the CD-ROM audio cable coming from the cd-rom in the drive enclosure section of the case. The next card up is the network card and above that is the video card. There is no AGP video card slot on these older MMX boards...
The cpu with it's fitted fan is to the right of the ISA slot's - The red/black thin lead coming off the fan is the power cable... To the right of the cpu/fan, is 3 small red & red/black twin-strand cables ... these are for the beep/speaker, the reboot button switch and the h/d activity led connector.
Various wide flat grey cables come off the board to connect the drives for data transfer... above the flat cables are 4 empty long horizontal slot's and immeadiatly above those is two longer slots which contain two sticks of ram....
Here's another shot with some colour coding....
Circled in red is the power-block connector from the power-supply - you can see it has a small loom of coloured wires connecting to it, and this runs back into the power supply. - You can see the two occupied sdram slot's indicated by the two red arrows on the upper right area of the motherboard

The two main wide flat cables in this picture are coloured blue and red.. IDE 1 & IDE 2... each of those cables connects to up to 2 drive units each - of those two drive unit's wether cdrom, hard-drive or cdrw etc, one will be the MASTER and one will be the SLAVE device. Boards like this older shape/chipset could handle 2 IDE channels each with 2 drives on a channel for a total of 4 drives, plus the floppy drive on it's own bus.
However.. you can with newer boards such as for all current main intel & amd chips get a motherboard with ata100 features which can assign 4 drives to each IDE channel. The other option is to install a dedicated drive controller card to add more devices on an older board like this.
ATX CASES
This is the newer type of case & motherboard.. but you can now get old shape boards to fit the older cases that will take P3 & AMD latest chips...

ATX boards tend to be smaller & narrower - In the image above you can see the 3 main area's:

further down the case, facing the rear panel is the AGP & PCI slots where you add your cards....
Well... That's the main bits - The data flow connects our audio & midi data with the outside world....
HOW IT ALL CONNECTS
This is a simplified view of how the parts connect... The chipset controls data flow. - remember, this is highly simplified, there is also other things on the board like a seperate USB bus, a system timer and c-mos battery to keep the bios alive when the pc is powered down.. The motherboard may have onboard video or audio codec's (converter chips) & their connectors which will have their own small buss's to carry the data too as does the Printer & Comm ports... This page remember is just so newbies can get a hang of the parts...
In the actual PC you are looking at in the photo's above, on the 200mmx machine (the big tall case), the IDE_1 controls a disk drive and a cd-rom as master & slave - the IDE_2 channel has a pair of hard-drives as master & slave. - But there is no AGP port on those older boards, as AGP wasn't created when those older 200mmx chips were released.
But you CAN see the AGP board alongside the PCI slot's in the images of the newer pentium_3 ATX machine images....
This diagram shows a typical AGP board of the type you'll buy everytime you build a Intel or AMD chip machine... here's the basic main connectors so you can get a hang of how all the parts connect and carry data....

well that'll do for now... This is just the basic's and doesn't go into details about how those sections all co-operate, for more on that you'll have to see the next article which also will relate to the 'Vcache' & 'Vmemory' articles as well as articles we will add about the hard-drives etc....
I might add some more to this page, but most likely will start a new page for 'Part_2' of this article... but, that's the parts that comprise a pc for newbies anyways!!....
ROLL YOUR OWN??
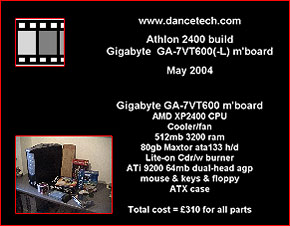
When building a project PC... the parts, will be at a minimum:
PC build parts list
You can build cheaper there are shortcut's... as i say, the figure of �1000 above represents a fast machine, not the cutting edge but very fast a gigaherts minimum machine with 1/2 gb of ram.
We can step down from there and we float around in 500-800 territory... remember alot of this investment is the s/ware & the audio/midi card!... the pc parts are cheap!....
For a �500 setup, we are always looking to the celeron, lower speed pentium or the amd Duron processors bought in a kit with a budget motherboard - these budget boards such as Jetway are very good and they work ok....
also at this reduced price system we'd be looking at s/w such as Logic Silver or Cubasis VST... the cheaper cut down versions of the biggies, or we'd look to s/w such as REASON or ORION or perhaps Fruity-Loops etc to create with....
for either system we work mostly in s/w, so our soundcard is for monitoring and record... we can buy a cheap card today and get 24/96 performance with good asio and other driver support.... so you can choose from a starting price of around $100 for a AudioTrak Maya or a Hoontech dsp24/96 value etc...
Even cheaper still is the humble OEM copy 'in-a-bag' Soundblaster Live (sometimes prefixed 1024) - This
card comes in from PC fairs at �30 quid and with the APS driver hack you can run asio 8ms drivers with it... see the: 'SBLIVE & aps drivers' page in dancetech articles for more on that...
CHEAPER PC RUFF - all parts
| Case with power supply | �35 - $50 |
| cpu/m'board/cooler kit | �130 - �150 |
| 133 system ram | 256mb = �30 |
| hard drive (10-40gb) | �80 - �120 |
| agp graphic's card | ati rage = �30 |
| mouse & keyboard | �20 |
| screen | adi etc = �90 - �150 |
| cd-rom | �35 |
| Windows OS | �45 |
| audio/midi device | �35 (sblive oem) |
| music software | Logic silver, vst cubasis orion, reason etc |
| Case with power supply | �35 - $50 |
| cpu/m'board/cooler kit | �130 - �150 |
| 133 system ram | 256mb = �30 |
| hard drive (10-40gb) | �80 - �120 |
| agp graphic's card | ati rage = �30 |
| audio/midi device | �35 (sblive oem) |
| music software | Logic silver, vst cubasis orion, reason etc |
That'll upgrade to a new fast machine such as a Duron 800 or P3 800, carrying over some parts from the old PC to save cost.... with a s/w like logic silver or Cubasis vst, reason or orion pro etc.
Posher �1000.00 PC ruff
With this one we go for the VST full or Logic Gold< Reason etc as a guidestick for s/w price.
| Case with power supply | �35 - �50 |
| cpu & motherboard kit | �150-�180 |
| 133 system ram | 512mb = �60 |
| hard drive | �120 - �140 |
| agp graphic's card | �30 - �90 |
| mouse & keyboard | �20 |
| screen | �150 |
| cd-rom/write | �120 - �130 |
| Windows OS | �45 |
| audio/midi device | �170 - �200 |
Add to this cost the music s/w of choice...
So that'd be for a fast box, and athalon 1gh or a P3 1ghz - with a nice tdk or whatever cdwriter, 1/2gb of ram, a17" screen, a card such as Midiman delat, Windows OS and a 40gb drive plus a nice �100 quid budget AGP card for some nice gaming.
Of course, if you have Windows already you save �45 quid or so - or if you forgo a Cd writer which isnt critical you save another �80 quid or so - or if you stick with a cheap oem agp ATI graphic's card you save �70 quid and an ATI 8mb AGP card is PLENTY to run music s/w - there you just clipped �150- �200 off the price right there if you have all four of those things ... yet you still have a fast athalon or Pentium box all legal & paid for new and ready to go with a quality soundcard/midi i/o...
And of course, if you have your music s/w already bought you dont have that outlay, so the above 'Posher' system is really total cost for everything including Windows from scratch...
Also people think that the pc can 'do it all' - WRONG, and it is WAY better to get a 'decent' reasonable speed pc and save the extra you might waste on getting the top of the line current PC and instead invest in the accessories you need for making trouble free music - You really do need to get a few extra's depending on the style you create and wether you are recording audio from mic's... because of course.. you need a mic and then you need a decent mic pre-amp etc... so there are a few other things to get...
This is important, because actualy spending a bit LESS on the PC and more on a decent pre-amp and some monitoring extra's such as a cheap multi-fx and a small mixer etc are WELL worth it as you'll be MORE productive than trying to get the PC to be fast enuff to do those tasks for you at reasonable track rates.
Of course, you also need a midi keyboard to play your s/w sounds... some midi leads.. it add's up!
Better close now.... next we'll move on to a build step by step.. but also we'll keep adding pages for the MAIN area's you'll need to refer to to do a build... stay tuned...


Read 2 comments
Add review/comment